Starry Night model

In order to start modeling the starry night painting I first looked for some online references of other artist that attempted this. This 3D version of the painting is going to be shown at the end of the animation and has to fit with the rest of the animation style. As it is now I have thought about two ways with which I could interpret the painting: model it or using camera projection from a drawing that I will make to follow the style of the animation. I will try both and see which one works better.

The following are some examples of other artist who revisited the painting in 3D:

A Korean 2D & 3D motion graphic designer – Kim Gryun has shared his amazing work which inspired by Vincent Van Gogh. He selected ‘Van Gogh’s Bedroom at Arles’ and ‘The Starry Night’ to make a realistic rendering with Octane Render in Cinema 4d and some post production with After Effect. As you can see in the video the sky which is the less realistic part is slightly moving which is something I would like to incorporate in my model.

Vincent Van Gogh’s Starry Night Painting turned into a VR diorama. what I like from this interpretation are the bright particles in the sky which give a “magical” vibe and vibrancy to the whole artwork.

The interesting thing about this artwork is the use of perspective that the artist made as well as the fact that the stars and the moon in the sky are painted as independent parts. The colour rendering is also very nice since the artist added some grain to add a halo on the artwork

The work by this artist is interesting as well: each main section of the painting has been separated from the rest to create depth and movement to the artwork, in my case I could create a 2D artwork inspired by the painting and separate the different parts to create perspective as well since that the camera will not have to navigate through the artwork oppositely to the other artworks in the animation.

sky motion effects

I thought I would start by creating the 3D assets as part of the composition just like I did for the other paintings.

I started out with the tree model from a cone polygon and adding subdivisions and tying to simulate the tree shape.

Afterwards I have applied the texture as well.
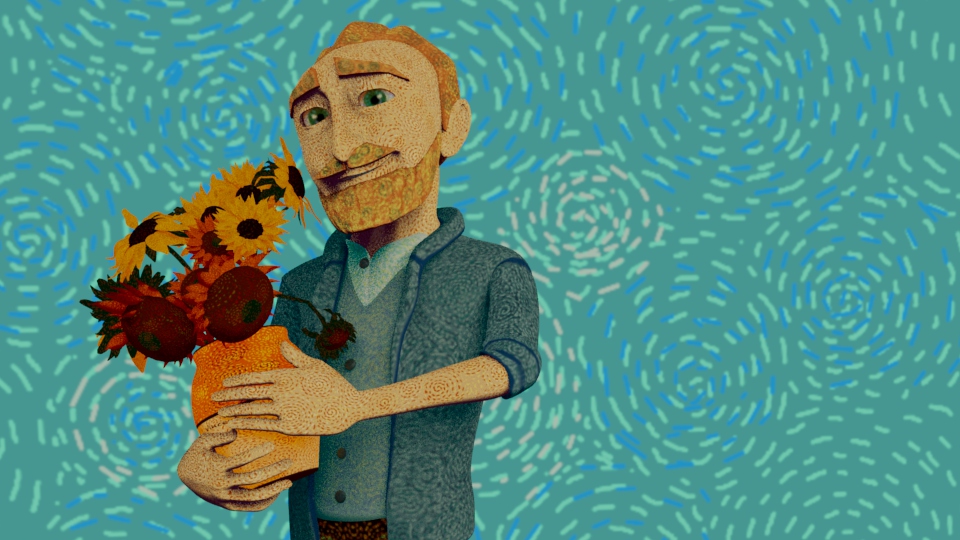
Animation style moodboard and sunflower model and texture update

In order to visualise better the animation style I have created this “moodboard” where I have merged together the coloured painting and the sketches version of the painting. I will use this “sketching scenario” when I will share information over the artist or the painting the sketch is about.

I have also started uv mapping the sunflower models using an automatic mapping and applying the photoshop texture afterwards.

the final effect I wanted to achieve is the same of the painting where the vase would stand against the blue background (which I have used for the room wallpaper)

Storyboard update

Miro board link:

During the break we had during summer I have been creating the assets that I will be needing for the animation as well as the character, I have also been consulting some sources as well attending to some events related to Van Gogh and his life. Because all of this I have decided to revisit the storyboard adding some ideas and some transitions: at first I thought that in order to share the information on either the artist or his artworks I would create some letters resembling those that the artist himself made and which are a huge contribution to what we know about him nowadays. However, the way I originally inserted them into the animation made them a bit repetitive and would create problems in terms of the information shared and the writhing which would be to small and that would make audience loose interest. After going to the Vang Gogh experience (see this post https://marianna3dcomputeranimation.myblog.arts.ac.uk/?p=1057) I was really captivated by the way they transitioned from the real coloured painting to the sketch he made in his letters: so, according to this I have thought I could transition from the 3D painting to the 2D sketch to share the informations about his works and his life to make it more visually interesting.

This is the up dated version of the storyboard:

texture update and rigging

This week I ultimate the texture for the bedroom assets. I started out with the chair which is the only element I added some height information to create the straw seat.

For some of the models the definition of the brush strokes was not great. So I have edited the UV map information on it but the resolution would not still improve.

So, I opted for a photoshop texture that I have created following the style I have used so far.

This is the initial look of the house environments

I have decided to change the texture for the floor since that the one I have applied before was too dark.

This week I have also created the facial rig of the character using advanced skeleton:

Final character rig

Props modelling

This week I started to model another important part of the animation: the sunflower. I started with the vase model using the curve tool and revolving the curve after to turn it into a vase.

In order to create the petals and the leaves of the flowers I fist had a look at the brushes and paint effect that Maya comes with: I actually found some sunflowers and some grass looking brushes. Although I was not able to use them since they are not quite similar to those in the painting and edit them with have taken more than creating them from scratch.

So, I have taken individual flowers and starting to make a model to resemble them.

This is the finished model for the bedroom and the adjacent room where the sunflowers and the self-portrait will be:

I have imported the model in substance painter and started texture the individual assets according to the style I have adopted for the character textures

texturing part2, rigging and modelling

Unfortunately this week when I was trying to open back again the texture file substance painter would not let me because the file data was to recent for that software version of the program: I am working using the remote access to the lab at university and unfortunately they are updating the system during this period so that might be the cause.

So I had to start again, but it was not an issue since that I felt that I did not get to the point where I was happy with the texture I had previously created. This time I also tried to add some height information to the brush strokes to see how it would appear on the model trying to emulate the painted impasto technique. Although, I was not happy with it and the overall look appeared to be too chaotic and the colours would not blend together well. Also, when adding several brush strokes with that thickness to the same area they would come together as one by brush stroke and part of the thickness would appear flat overall.

Thinking of the starry night especially the sky I came up with a style that I could use to texture not only the character but the environments too: in that painting appeared to be consecutive brush strokes that form spiral shapes. This style other that creating movement in the texture can be a nice translation to van gogh painting technique which would let me use different colours applied not evenly but with different values and forms that would blend and work together well.

to speed up the process I have used the mirroring tool:

When I fist applied the textures to the model they were extremely dark so I have tried to have a look at the lighting settings in maya and I opted fro flat lighting which is the effect I wanted to achieve after all.

effect with flat lighting:

once the textures were applied I have used advanced skeleton to create the rig for the character.

After I started modelling the bedroom asset using the character model as a reference for the dimension: The bed model was already done since it was part of the premise project I did last term.

for some cloth or even the jackets present in the painting I have used a cloth simulation to give them a more natural look.

After I have applied the cloth simulation I have modified them with the lattice tool in maya

week 25: screenwriting workshop

having a structure for a narrative is essential, introduction, confrontation resolution.

The Syd Field Paradigm

Field’s Paradigm allows the organization of stories into structured timelines. Act One: story set up; Act Two: confrontation; Act Three: resolution. In 1979, for the first time in screenwriting history, Syd introduced the Paradigm in Screenplay – The Foundations of Screenwriting. Structure always exists.

Simply put, structure holds the story together; there is a beginning, middle and end, (not necessarily in that order), and a point at which the beginning turns into the middle, and the middle turns into the end.

That point is called a Plot Point. It is any incident, episode or event that hooks into the action and spins it around into another direction; in this case, either Act II or Act III.

the filter model:

general, specific, very specific

conclusion very important

Final year project:

week 26: Van Gogh experience

Some information about his life and artwork that were shared on the exhibition:

  • optical illusions in mapping effect come one after another such as shrinking walls to represent the state of mind which he was in.
  • is it madness that makes an artistic genius of him?
  • several trips to paris gave him the opportunity to enjoy the rich artistic life of the city, and to visit museums and art galleries.
  • attracted by the luminous nature of the southern skies, and the warm colours, he left for the south of France, deciding to settle in arles.
  • he was troubled throughout his life by poor mental health (epilepsy and schizophrenia), the crises became more frequent and more violent.
  • in February 1888 he travelled to arles, france, where he moved into the yellow house. while there, he painted the bedroom, he was joined by paul gauguin. Their often contentious friendship deteriorated as Van Gogh’s psychotic events grew more frequent. following an argument with Gauguin Vincent mutilated his own ear on December 23. As a result, Gauguin left Arles.
  • 1889: after the mutilation, the artist lived alternately between a psychiatric hospital and the yellow house. During this period he produced works such as the starry night, an abstraction of the view from his room at the asylum.
  • The sunflowers: the second series of sunflowers he paints during 1888 and 1889 depicting the sunflowers in a vase are the most famous ones. sunflowers were in vogue during the 1870’s. van gogh’s first painting from the sunflowers series is displayed in a restaurant-cafe in Paris , where gauguin discovered it. This recognition from someone vang gogh so deeply admired, gave him the encouragement to move into a studio in Arles.. Once established in Arles, in 1888, e writes to his brother:

“In the hope of living in a studio of our own with Gauguin, I’d like to do a decoration for the studio. Nothing but large Sunflowers.Next door to your shop, in the restaurant, as you know, there’s such a beautiful decoration of flowers there; I still remember the big sunflower in the window.5 Well, if I carry out this plan there’ll be a dozen or so panels. The whole thing will therefore be a symphony in blue and yellow. I work on it all these mornings, from sunrise. Because the flowers wilt quickly and it’s a matter of doing the whole thing in one go.”

he hung several of his sunflowers in the guest room intended for Gauguin, who will later describe these works as “a perfect page of an essential “vincent style”

By choosing sunflowers, flowers which characteristically regrow, and by displaying them at their different phases of life, all within the one arrangement, van gogh creates a metaphor for the cycle of life.

  • “instead of trying to reproduce exactly what I see before me, I make more arbitrary use of color to express myself more forcefully”
  • vincent’s aggressive and disorderly character also made the cohabitation with gauguin intense. Gauguin describe him using this words: ” in spite of all this disorder, this mess, something shone out of his canvasses and out of his talk too.” their artistic perspective was wildly divergent: vincent painted from nature while gauguin encouraged his friend to paint from memory they had “incompatibility of temperaments”. December 1888 23rd a new argument broke out propped vincent to cut his own ear.
  • the majority of his art was created in the last 10 years of his life, with an average of a new place every 36 hours.
  • van gogh immediate surrounding were always a strong source of inspiration, and this was the case with the yellow house at arles on southern France. He lived here from february 1888 until december 1890, and built his first studio here. bedroom at arles: the dominant object of this oil painting is the solid and simple bed. seemingly violating the rules of perspective, van gogh explained the deliberate choice to his brother, theo. he wished to flatten the interior leaving out shadows, so that his picture resembled the japanese prints he found so inspiring. some of vincent’s paintings hang above the bed, giving us a clue as to the work he wished to surround himself with. The pieces, lament, poets, and painter aux etoiles, feature friends and colleagues. of the room’s palette, van gogh stated: ” I had wished to express utter repose with all these very detailed tones”. “when I saw my canvasses again after my illness, what seemed to me the best was the bedroom.” there are three different versions of this painting differencing in brightness and colour contrast. the pigmentation is quite unique in each version of the work.
  • “I put my heart and my should into the work and have lost my mind in the process” plagued by hallucinations, van gogh asked to be committed.to the saint paul de mausoleum asylum. turning one room into a dedicated studio space, van gogh created 150 paintings and nearly 100 drawing in just one year. even in a time of great personal darkness, van gogh filled his canvas with light. he painted a myriad of works depicting the asylum. “I don’t know anything with certainty, but seeing the stars makes me dream”. Vincent relentless painting only ceased during periods of overwhelming psychosis. and only one painting emerged from such a crisis: a self-portrait. painted in the summer of 1889, van gogh’s image is muted; it represents a haunted reflection of the artist. the crumped, defeated figure is a heartbreaking portrait of a man overwhelmed by cruelties of existence.

week 26: Uv mapping texturing and projection mapping

After I completed the character model I have Uv mapped to export it in substance painter to texture it.

For the Uv mapping I have created first a planar map and cut the uv shell to then unwrap it so that the surface would be spreader out evenly. I have repeated the process for each part of the character body.

Once I had uv mapped the character I have smoothed it in maya and exported the mesh as a fax file: I have smoothed it so that in substance painter it would appear not in preview mode and the texture files would not be stretched afterwards.

I have started from the face texture and since that the design of the character is inspired from one of his self-portraits I have tried to pick the colour palette from that artwork and try to translate the painting style into substance. I have experimented with different brushes in substance that had different textures in order to replicate van gogh’s art style.

I have also added several stains of bright colour to the skin to add more vibrancy and also since van gogh in his paintings usually adds green and blue to the skin palette. I have also added some red to the fingers and to the cheek.

this is how the model looks so far: I had only textured the skin and added a fill colour to the other parts following to my concepts.

week 25: Modelling the character

This week I have carried on with the modelling of the character

For the beard I have edited some of the folds that I had previously created to make the crease blend on the surface rather to have it from edge to edge

face look development:

I have also started modelling the shoes starting from a polygon cube and adding subdivisions and edge loops in order to get to the final shape

To create the buttons I have extruded the faces in the preview mode.

jacket update

I have started shaping the arm

In order to add details in the hands I followed this fingers and nails tutorial:

This week I have also carried a little experiment to create a projection mapping starting from a drawing of a potential environment I have created according to my storyboard.